

Follow this example to get started using Greengrass with your Digi embedded devices.
Example: Control a robotic arm with Greengrass
In this example, an on/off switch controls a robotic arm. Two Lambda functions enable you to control the robotic arm’s on/off state from the cloud:
-
uptime Lambda monitors the on/off state of the robotic arm and sends the status data to the cloud.
-
message Lambda accepts generic messages from the cloud and converts them to messages the system can use with the local Shadows Service.
Follow these steps:
| The steps in this guide use the AWS IoT Console, but you can also use the AWS CLI. |
1. Program the Greengrass-enabled firmware
Digi provides pre-built images with pre-installed Greengrass core software.
1.1. Update from Linux
If your device is already running from Linux, use the update package (*.swu) to program the firmware:
-
Download the update package:
-
For ConnectCore 6 Plus SBC: https://ftp1.digi.com/support/digiembeddedyocto/3.0/r4/images/ccimx6qpsbc/fb/dey-image-aws-swu-ccimx6qpsbc.swu.
-
-
Follow the steps at Program firmware from Linux.
1.2. Update from U-Boot
Alternatively, you can use U-Boot to program your device:
-
Download the images for each partition:
-
For ConnectCore 6 Plus SBC: from https://ftp1.digi.com/support/digiembeddedyocto/3.0/r4/images/ccimx6qpsbc/fb/.
-
-
Follow the steps at Program firmware from U-Boot.
2. Sign in to your AWS IoT console
-
If you don’t have an AWS account, follow these steps to create one:
-
Open the AWS home pageand select Create an AWS Account.
-
Follow the instructions. Note that you will need to enter a PIN using your phone’s keypad as part of the sign-up procedure.
-
-
Sign in to the AWS Management Console.
-
Open the AWS IoT console. You can use the console search.
3. Set up your Greengrass core
An AWS Greengrass core is an AWS IoT device running specific software. This software enables the core to communicate with AWS IoT and AWS Greengrass cloud services.
| See http://docs.aws.amazon.com/greengrass/latest/developerguide/what-is-gg.html for a full description of the AWS Greengrass core software. |
To set up your Greengrass core, follow these steps:
3.1. Create an AWS IoT thing for your core
Using the AWS IoT console, create an AWS IoT thing, certificate, and policy for your AWS Greengrass core device:
-
Go to the AWS IoT console.
-
Create an AWS IoT Thing for your AWS Greengrass core and name it GGC_Thing. For more information, see Register a Device in the Thing Registry.
-
Create an AWS IoT certificate and private key for your Greengrass core. For more information, see Create a Device Certificate.
-
Download the certificate and private key and save them in a safe place. You will copy them to your AWS Greengrass core device later.
-
Attach your device certificate to your AWS IoT thing, GGC_Thing. For more information, see Attach a Certificate to a Thing.
-
Make sure your certificate is activated.
-
Create and attach an AWS IoT policy to your device certificate.
An AWS IoT policy designates the AWS IoT resources your Greengrass core can access. To create and attach a policy, see Attach an AWS IoT Policy.
Use the Advanced mode to enter the following policy that allows the identity associated to perform all AWS IoT and AWS Greengrass operations:
{
  "Version": "2012-10-17",
  "Statement": [
    {
      "Effect": "Allow",
      "Action": [
        "iot:*",
        "greengrass:*"
      ],
      "Resource": [
        "*"
      ]
    }
  ]
}
3.2. Install certificates on your core
AWS IoT requires your core device to use MQTT over TLS to establish a secure connection. To do so, the certificates must be installed on the core device:
-
Download the AWS IoT root CA certificate from Symantec/Verisign.
-
Place the AWS IoT root CA certificate into the /greengrass/certs directory of your device. You can use scp command.
~$ scp root-ca.pem root@<ip>:/greengrass/configuration/certs/
-
root-ca.pem is the AWS IoT root CA certificate.
-
<ip> is your device’s IP.
-
-
Place the core’s certificate and private key associated with your device in the /greengrass/certs directory.
~$ scp <id>.pem.crt root@<ip>:/greengrass/configuration/certs/
~$ scp <id>-private.pem.key root@<ip>:/greengrass/configuration/certs/
-
<id>.pem.crt is the certificate attached to your core. The AWS Greengrass core uses this certificate to authenticate with AWS IoT and AWS Greengrass.
-
<id>-private.pem.key is the core’s private key. The AWS Greengrass core uses this key to authenticate with AWS IoT and AWS Greengrass.
-
<ip> is your device’s IP.
3.3. Configure your Greengrass core
To configure your core to recognize the AWS IoT thing you created for it, update the /greengrass/config/config.json file:
{
    "coreThing": {
        "caPath": "[ROOT_CA_PEM_HERE]",
        "certPath": "[CLOUD_PEM_CRT_HERE]",
        "keyPath": "[CLOUD_PEM_KEY_HERE]",
        "thingArn": "[THING_ARN_HERE]",
        "iotHost": "[HOST_PREFIX_HERE].iot.[AWS_REGION_HERE].amazonaws.com",
        "ggHost": "greengrass.iot.[AWS_REGION_HERE].amazonaws.com"
    },
    "runtime": {
        "cgroup": {
            "useSystemd": "no"
        }
    }
}-
caPath: The path to the AWS IoT root CA certificate relative to /greengrass/certs directory.
-
certPath: The path to the core’s certificate relative to /greengrass/certs directory.
-
keyPath: The path to the core’s private key relative to /greengrass/certs directory.
-
thingArn: The ARN of the thing that represents the core. The ARN is a unique identifier assigned to your device in the cloud.
Follow these steps to find the thing ARN for your core:
-
In the navigation pane, select Registry and then Things.
-
Select your core thing, GGC_Thing to display its details page.
-
Copy the ARN of your core. It will be similar to: arn:aws:iot:us-west-2:ABCDEFG1234567:thing/GGC_Thing
-
iotHost: Your AWS IoT endpoint.
In the navigation pane, select Settings. Copy your custom Endpoint. It will be similar to: ABCDEFG1234567.iot.us-west-2.amazonaws.com
-
ggHost: The AWS Greengrass endpoint, greengrass.iot.us-west-2.amazonaws.com.
Replace us-west-2 with the region you are using to access Greengrass. Your config.json will look similar to the following:
/greengrass/config/config.json{ "coreThing": { "caPath": "root-ca.pem", "certPath": "<id>.pem.crt", "keyPath": "<id>-private.pem.key", "thingArn": "arn:aws:iot:us-west-2:ABCDEFG1234567:thing/GGC_Thing", "iotHost": "ABCDEFG1234567.iot.us-west-2.amazonaws.com", "ggHost": "greengrass.iot.us-west-2.amazonaws.com" }, "runtime": { "cgroup": { "useSystemd": "no" } } }
-
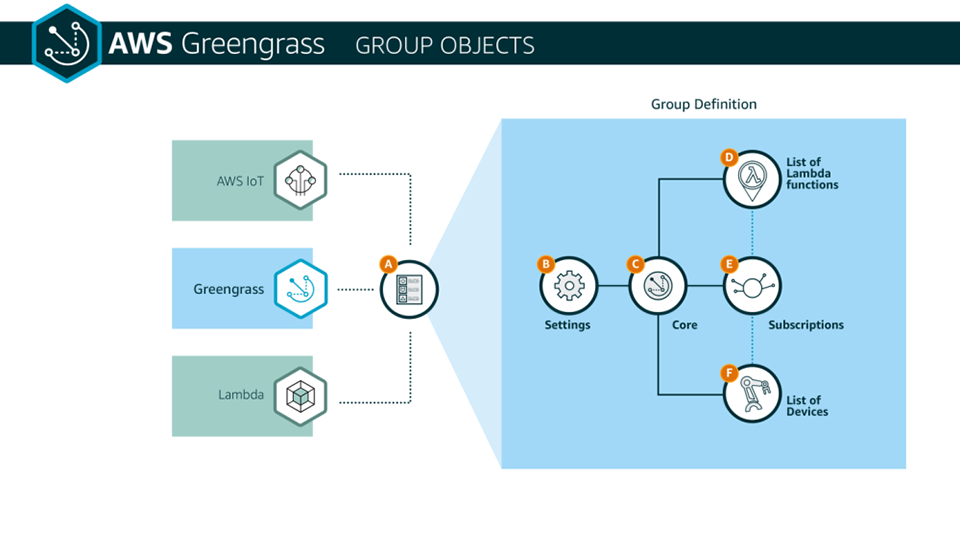
4. Set up a Greengrass group
An AWS Greengrass group is a collection of local devices and Lambda functions that represents your local environment. You can program your group components to communicate with each other through a Greengrass core device.
Groups contain:
-
A core device with which all other devices in the group communicate.
-
A list of devices that belong to the group.
-
A list of Lambda functions that are deployed to the core.
-
A subscription table that contains the predefined MQTT protocol-based routes that Greengrass cores use to transmit messages between devices, Lambda functions, and AWS.
4.1. Create a Greengrass group
Follow these steps to create a Greengrass group:
-
Go to the AWS IoT console.
-
In the navigation pane, select Greengrass and then Groups.
-
Click Create Group.
-
On the Set up your Greengrass Group page, click Customize.
-
Type a name for your Group, for example GGStoryLine.
-
Click Next.
-
On the Attach an IAM Role to your Group page, click Add role later.
-
On the Add a core to your Group page, click Use existing Thing.
-
On the Select an existing IoT Thing as a core page, look for your core name, GGC_Thing, and select it.
-
Click Create Group and core.
4.2. Create device things
Use the AWS IoT console to create two things:
-
RobotArm_Thing to represent the robotic arm.
-
Switch_Thing to represent the switch on the robotic arm.
Follow these steps to create the things, their certificates, and policies:
-
Go to the AWS IoT console.
-
Create an AWS IoT Thing for:
-
The robot arm: RobotArm_Thing
-
The switch: Switch_Thing
For more information, see Register a Device in the Thing Registry.
-
-
Create AWS IoT certificates and private keys for the robot arm and the switch. For more information, see Create and Activate a Device Certificate.
-
Download the certificates and private keys and save them in a safe place. You will copy them to your robot arm and switch devices later (see Install your thing certificates).
-
Attach the device certificates to your AWS IoT things, RobotArm_Thing and Switch_Thing. For more information, see Attach a Certificate to a Thing.
-
Make sure the certificates are activated.
-
Create and attach an AWS IoT policy to your device certificate.
An AWS IoT policy designates the AWS IoT resources your Greengrass device can access. To create and attach a policy, see Attach an AWS IoT Policy.
Use the Advanced mode to enter the following policy that allows things to automatically sync their shadow status online and use discovery functionality.
{
  "Version": "2012-10-17",
  "Statement": [
    {
      "Effect": "Allow",
      "Action": [
        "iot:*",
        "greengrass:*"
      ],
      "Resource": [
        "*"
      ]
    }
  ]
}
4.3. Add devices to your group
Once the robot arm and the switch things are registered, add them to your Greengrass group.
-
Go to the AWS IoT console.
-
In the navigation pane, select Greengrass and then Groups.
-
Click on your group, GGStoryLine.
-
In the navigation pane, click Devices and then Add Device.
-
Click Select an IoT Thing.
-
Select the RobotArm_Thing you created at Create device things.
-
Click Finish.
-
Repeat steps 4 to 7 for Switch_Thing.
-
Configure the RobotArm_Thing. Click the ellipsis on the top right of the RobotArm_Thing box and select Sync to the Cloud.
4.4. Create Lambda functions
Greengrass cores can run Lambda functions in response to messages sent by your devices or other Lambda functions. Create two Lambda functions:
-
uptime to monitor the robot arm state when it is turned on and off.
-
message to convert generic messages that control the robot arm from the cloud and into messages that our system can use with the local Shadows Service.
Later, you will add these Lambda functions to your Greengrass group so you can deploy them to your Greengrass core.
Follow these steps to create two Lambda functions with the data in the following table:
| Name | Zip file | Handler | Alias name |
|---|---|---|---|
uptimeLambda |
storyline_uptimeLambda.zip |
uptimeLambda.uptime_handler |
storyLineUptime |
messageLambda |
storyline_messageLambda.zip |
messageLambda.message_handler |
storyLineMessage |
-
Download the AWS Greengrass Core SDK from your account.
-
Go to the AWS IoT console.
-
Click Software in the navigation bar.
-
Inside SDKs > AWS Greengrass Core SDK, click Configure download.
-
Select Python 2.7 version 1.0.0 in the combo box and click Download Greengrass Core SDK.
-
Decompress the greengrass-core-python-sdk-<version>.tar.gz.
-
Use the Service drop down menu to navigate to the AWS Lambda console.
Use the same region for Greengrass and Lambda console. If you are accessing Greengrass in the us-west-2 region, use the Lambda console in the us-west-2 region. -
In the Lambda console, click Create function.
-
In the Name field, type the name of the Lambda function you are creating. See the table.
-
In the Runtime drop down menu, select Python 2.7.
-
In the Role drop down, select Choose an existing role. In the Existing role drop down, select any role. The role is not important because AWS Greengrass does not use it. If you do not have a role, choose Create a custom role and follow the steps.
-
Click Create function.
-
In the Function code section, select Upload a .ZIP file in the Code entry type drop down.
-
Click Upload and select the corresponding zip file located at examples/Storyline inside the greengrass-core-python-sdk-<version>.tar.gz tarball.
-
In the Handler field, type the handler for your Lambda function.
-
Review the Lambda settings and click Save button at the top right.
-
Publish a new version of the Lambda function from Actions > Publish new version.
-
Click Publish in the Publish new version dialog. AWS Lambda creates a new version and assigns an increasing sequence number to it, 1 for the first version.
-
Associate an alias with this published version from Actions > Create alias.
-
In the Name field, type the corresponding alias name.
-
In the Version menu, select the version that was just published. In this case, select 1.
-
Click Create.
4.5. Add Lambda functions to your group
Once the Lambda functions are created, add them to your Greengrass group.
-
Go to the AWS IoT console.
-
In the navigation pane, select Greengrass and then Groups.
-
Click on your group, GGStoryLine.
-
In the navigation pane, click Lambdas and then Add Lambda.
-
Click Use existing Lambda.
-
Select the uptimeLambda you created at Create Lambda functions.
-
Click Next.
-
Select the alias of for this function, Alias: storyLineUptime.
-
Click Finish.
-
Repeat steps 4 to 9 for messageLambda function.
4.6. Add subscriptions to your group
Subscriptions are the predefined MQTT protocol-based routes that Greengrass cores use to transmit messages between devices, Lambda functions, and AWS. A subscription consists of:
-
A source. It is an ARN the originator of the message. It can be the ARN of a thing, a Lambda function, or the cloud.
-
A target. It is an ARN that identifies the destination of the message. It can be the ARN of a thing, a Lambda function, or the cloud.
-
A topic. It allows you to filter the data that is sent from the source to the target.
A message will only be sent if there is a defined subscription for the source and the target.
For this example, create the following subscriptions:
| Source | Target | Topic | |
|---|---|---|---|
1 |
Switch_Thing |
Local Shadow Service |
$aws/things/RobotArm_Thing/shadow/update |
2 |
Local Shadow Service |
RobotArm_Thing |
$aws/things/RobotArm_Thing/shadow/update/accepted |
3 |
Local Shadow Service |
RobotArm_Thing |
$aws/things/RobotArm_Thing/shadow/update/rejected |
4 |
RobotArm_Thing |
uptimeLambda |
/topic/state |
5 |
RobotArm_Thing |
Local Shadow Service |
$aws/things/RobotArm_Thing/shadow/update |
6 |
Local Shadow Service |
RobotArm_Thing |
$aws/things/RobotArm_Thing/shadow/update/delta |
7 |
uptimeLambda |
IoT Cloud |
/topic/metering |
8 |
messageLambda |
Local Shadow Service |
$aws/things/RobotArm_Thing/shadow/update |
9 |
IoT Cloud |
messageLambda |
/topic/update |
10 |
Local Shadow Service |
Switch_Thing |
$aws/things/RobotArm_Thing/shadow/update/accepted |
11 |
Local Shadow Service |
Switch_Thing |
$aws/things/RobotArm_Thing/shadow/update/rejected |
Repeat the following steps for each subscription in the table:
-
Go to the AWS IoT console.
-
In the navigation pane, select Greengrass and then Groups.
-
Click on your group, GGStoryLine.
-
In the navigation pane, click Subscriptions and then Add Subscription.
-
Under Select a source, select the source of the subscription.
-
Under Select a target, select the target of the subscription.
-
Click Next.
-
In the Optional topic filter, type the topic of the subscription.
-
Click Next.
-
Review the subscription information and click Finish to create it.
4.7. Configure logging
You can define where to store the logs generated by the core and your Lambda functions. You can store them on the file system of the Greengrass core device or on CloudWatch. In this example, you will store the logs on the Greengrass core hardware.
-
Go to the AWS IoT console.
-
In the navigation pane, select Greengrass and then Groups.
-
Click on your group, GGStoryLine.
-
In the navigation pane, click Settings.
-
Find Local logs configuration and click Edit.
-
Click Add another log type.
-
Select User Lambdas and Greengrass system as the components you would like to log.
-
Click Update.
-
Under User lambda logs section:
-
Select Debug logs as the level.
-
Set 5 MB as space limit.
-
Under Greengrass system logs section:
-
Select Informational logs as the level.
-
Set 5 MB as space limit.
-
Click Save.
5. Run Greengrass core in your device
The Greengrass core software is installed inside the /greengrass directory of your device. The core is automatically launched at boot if everything is configured properly.
-
Make sure your device is connected to the Internet.
-
Stop the Greengrass core to launch it manually.
~# /etc/init.d/greengrass stop
-
Remove the existing log files.
~# rm /greengrass/ggc/var/log/crash.log /greengrass/ggc/var/log/system/*.log
-
Run Greengrass core.
~# /etc/init.d/greengrass start
You will see the following output:
Setting up greengrass daemon
Validating execution environment
Found cgroup subsystem: cpuset
Found cgroup subsystem: cpu
Found cgroup subsystem: cpuacct
Found cgroup subsystem: blkio
Found cgroup subsystem: memory
Found cgroup subsystem: devices
Found cgroup subsystem: freezer
Found cgroup subsystem: perf_event

Starting greengrass daemon
Greengrass successfully started with PID: 1405
You configured the logs to be stored in the file system. To check:
-
/greengrass/ggc/var/log/crash.log: This file displays messages generated when the Greengrass core crashes.
-
/greengrass/ggc/var/log/system/runtime.log: This file includes messages about which component failed.
-
/greengrass/ggc/var/log/system: This directory contains log files for each Greengrass system component.
-
/greengrass/ggc/var/log/user: This directory contains log files generated by each Lambda function.
-
6. Deploy your Greengrass group
You have created a Greengrass group with your core, things, Lambdas, and subscriptions. This information exists only in the cloud until you deploy a group. At that time, the data is copied to your core device. To deploy the group configuration to the core:
-
Go to the AWS IoT console.
-
In the navigation pane, select Greengrass and then Groups.
-
Click on your group, GGStoryLine.
-
In the navigation pane, click Deployments.
-
Click Actions > Deploy.
-
In the Configure how Devices discover your Core select Automatic detection.
-
In the Grant permissions to access other services, click Grant permission.
All group data is being downloaded to the core. Deployment may take a couple minutes. When the operation is complete, the Deployment successfully completed is displayed at the top of the page.
Your core device must be connected to the Internet and running the Greengrass core software.
7. Set up your AWS IoT Things
Once the Greengrass group is defined and the core is deployed and running, you must set up the two things that are also part of the defined group: the switch and robot arm things. These two devices are simulated with code running on your development PC or using two different computers.
Follow these steps to set up your AWS IoT Things:
7.1. Build switch and robot arm samples
The switch and robot arm sample code is included inside the AWS IoT C++ device SDK. You can build and run both samples in the same Linux PC, or you can use two machines (one per device).
Follow these instructions to compile the samples on your Linux development machine:
-
Download the AWS IoT C++ Device SDK version 1.1.0 from GitHub.
-
Decompress the downloaded file.
-
Change to the aws-iot-device-sdk-cpp-<x.y.z> folder.
~$ cd aws-iot-device-sdk-cpp-<x.y.z>
-
Create a folder called build to hold the build files. Change to this folder. In-source builds are not allowed.
~$ mkdir build
~$ cd build
-
Run cmake in the upper directory.
~$ cmake ../.
The command downloads required third-party libraries and generates a makefile.
-
Build robot arm sample.
~$ make robot-arm-sample
-
Build switch sample.
~$ make switch-sample
-
The binaries are located in the build/bin directory.
|
To build these examples you need CMake and OpenSSL 1.0.2. Install CMake 3.8.0 Issue the following commands in your development computer to install CMake 3.8.0: ~$ wget https://cmake.org/files/v3.8/cmake-3.8.0.tar.gz ~$ tar -zxf cmake-3.8.0.tar.gz ~$ cd cmake-3.8.0 ~$ ./configure ~$ make ~$ sudo make install Install OpenSSL 1.0.2 Issue the following commands in the development computer to install OpenSSL 1.0.2: ~$ wget https://www.openssl.org/source/openssl-1.0.2k.tar.gz ~$ tar -xvzf openssl-1.0.2k.tar.gz ~$ cd openssl-1.0.2k ~$ ./config --prefix=/usr/ ~$ make ~$ sudo make install |
7.2. Install your thing certificates
The robot arm and the switch devices need certificates to authenticate with AWS IoT and retrieve the connectivity information of your Greengrass core. You downloaded these certificates in Create device things.
-
Download the AWS IoT root CA certificate from Symantec/Verisign.
-
Place the RobotArm_Thing certificates into aws-iot-device-sdk-cpp-<x.y.z>/build/bin/certs/robotArm:
-
Copy the AWS IoT root CA certificate.
~$ cp root-ca.pem <parent_absolute_path>/aws-iot-device-sdk-cpp-<x.y.z>/build/bin/certs/robotArm/
-
Copy the certificate and private key associated with the robot arm.
~$ cp <id>.pem.crt <parent_absolute_path>/aws-iot-device-sdk-cpp-<x.y.z>/build/bin/certs/robotArm/
~$ cp <id>-private.pem.key <parent_absolute_path>/aws-iot-device-sdk-cpp-<x.y.z>/build/bin/certs/robotArm/
-
Place the Switch_Thing certificates into aws-iot-device-sdk-cpp-<x.y.z>/build/bin/certs/switch:
-
Copy the AWS IoT root CA certificate.
~$ cp root-ca.pem <parent_absolute_path>/aws-iot-device-sdk-cpp-<x.y.z>/build/bin/certs/switch/
-
Copy the certificate and private key associated with the switch.
~$ cp <id>.pem.crt <parent_absolute_path>/aws-iot-device-sdk-cpp-<x.y.z>/build/bin/certs/switch/
~$ cp <id>-private.pem.key <parent_absolute_path>/aws-iot-device-sdk-cpp-<x.y.z>/build/bin/certs/switch/
7.3. Configure the samples
Inside the aws-iot-device-sdk-cpp-<x.y.z>/build/bin/config/ directory you can find the configuration files for your things:
-
RobotArmConfig.json
-
SwitchConfig.json
Edit these files and change:
| Parameter | Description | Robot Arm value | Switch value |
|---|---|---|---|
endpoint |
The IP address or domain of the AWS IoT endpoint. |
greengrass.iot.us-west-2.amazonaws.com |
greengrass.iot.us-west-2.amazonaws.com |
root_ca_relative_path |
The AWS IoT root CA certificate from Symantec/Verisign. |
certs/robotArm/root-ca.pem |
certs/switch/root-ca.pem |
device_certificate_relative_path |
The device certificate for each thing. |
certs/robotArm/<id>.pem.crt |
certs/switch/<id>.pem.crt |
device_private_key_relative_path |
The private key for each thing. |
certs/robotArm/<id>.private.pem.key |
certs/switch/<id>.private.pem.key |
| Replace us-west-2 with the region you are using to access Greengrass. |
8. Run the example
To see the AWS Greengrass group running:
-
Make sure the Greengrass core device is connected to the Internet.
-
Make sure the Greengrass core software is running in your device. To launch it, follow the steps at Run Greengrass core in your device.
-
Launch the robot arm and switch devices binaries. You can run both samples in the same Linux PC, or you can use two different machines (one per device).
~$ cd <parent_absolute_path>/aws-iot-device-sdk-cpp-<x.y.z>/build/bin
~$ ./robot-arm-sample
~$ ./switch-sample
-
To see the messages published by your Lambda functions, subscribe to all topics:
-
Go to the AWS IoT console.
-
In the navigation pane, select Test.
-
Enter # in the Subscription topic text field to subscribe to all topics.
-
-
You can control the robot arm state from the switch sample.
-
Type 1 and press enter to switch the robot arm on.
-
Type 0 and press enter to switch the robot arm off.
~$ ./switch-sample
[INFO] Thu Jun  8 22:00:15 2017
:314 [Discover] [139633896474496] Discover Read from Network Succeeded!
[INFO] Thu Jun  8 22:00:15 2017
:314 [Sample - Switch] [139633896474496] GGC connectivity information found for this Device!!

[INFO] Thu Jun  8 22:00:15 2017
:315 [Sample - Switch] [139633896474496] Attempting Connect with:
GGC Endpoint : 192.168.123.456
GGC Endpoint Port : 8883

[INFO] Thu Jun  8 22:00:15 2017
:315 [Sample - Switch] [139633896474496] Using CA at : /home/user/aws/aws-iot-device-sdk-cpp/build-native/bin/cb27a25e-405a-45ea-9140-9fd17e04c5cc_root_ca1.pem

[INFO] Thu Jun  8 22:00:15 2017
:690 [Network Read] [139633851291392] Network Connect Response. Success : SDK Code 0.
[INFO] Thu Jun  8 22:00:16 2017
:190 [Sample - Switch] [139633896474496] Connected to GGC arn:aws:iot:us-west-2:ABCDEFG1234567:thing/GGC_Thing in Group cb27a25e-405a-45ea-9140-9fd17e04c5cc!!

Please enter 1 (turn on) or 0 (turn off) to control the robot arm, q to quit:
-
-
You can remotely control the robot arm state from the cloud by publishing a message in the topic /topic/update:
-
To turn on, publish
{"state":"on"} -
To turn off, publish:
{"state":"off"}
-
-
Every time the robot arm state changes from the switch or the cloud:
-
The robot arm device prints out the state change.
~$ ./robot-arm-sample [INFO] Thu Jun 8 22:00:22 2017 :334 [Discover] [140425788536704] Discover Read from Network Succeeded! [INFO] Thu Jun 8 22:00:22 2017 :334 [Sample - RobotArm] [140425788536704] GGC connectivity information found for this Device! 400 [INFO] Thu Jun 8 22:00:22 2017 :334 [Sample - RobotArm] [140425788536704] Attempting Connect with: GGC Endpoint : 192.168.123.456 GGC Endpoint Port : 8883 [INFO] Thu Jun 8 22:00:22 2017 :334 [Sample - RobotArm] [140425788536704] Using CA at : /home/user/aws/aws-iot-device-sdk-cpp/build-native/bin/cb27a25e-405a-45ea-9140-9fd17e04c5cc_root_ca1.pem [INFO] Thu Jun 8 22:00:22 2017 :727 [Network Read] [140425743353600] Network Connect Response. Success : SDK Code 0. [INFO] Thu Jun 8 22:00:23 2017 :227 [Sample - RobotArm] [140425788536704] Connected to GGC arn:aws:iot:us-west-2:ABCDEFG1234567:thing/GGC_Thing in Group cb27a25e-405a-45ea-9140-9fd17e04c5cc!! Sending Inital State ------- {"state":{"reported":{"myState":"off"}}} Waiting for an update! -- Published state to /topic/metering (Should be routed to uptimelambda!) -- ------- Robot Arm State -------- on -
The robot arm is configured to synchronize its local shadow with the cloud shadow. This means robot arm cloud shadow is automatically updated. You should see the shadow state in the Test console.
-
A message is published to the topic /topic/metering with the current state of the robot arm.
-
