

The ConnectCore 8M Mini SBC device ships without an operating system loaded. Only U-Boot is programmed in the device. The following instructions demonstrate how to install Android in your device.
1. Download the firmware
-
Download the firmware images from https://ftp1.digi.com/support/android/11.0/r2/images/ccimx8mmdvk-installer.zip.
-
Decompress
ccimx8mmdvk-installer.zipin a directory of your choice.
2. Program the firmware
Once you have established a serial connection with your device, you can start the firmware update process. There are multiple methods of programming the firmware to the target:
-
Use the Universal Update Utility (UUU) through a USB connection to your development PC. Requires a Linux development machine.
-
Use a microSD card to install the firmware directly in the target.
Program the firmware using UUU
-
Set up the device:
-
Connect a micro USB cable to your development PC and the other end to the target USB recovery connector.
-
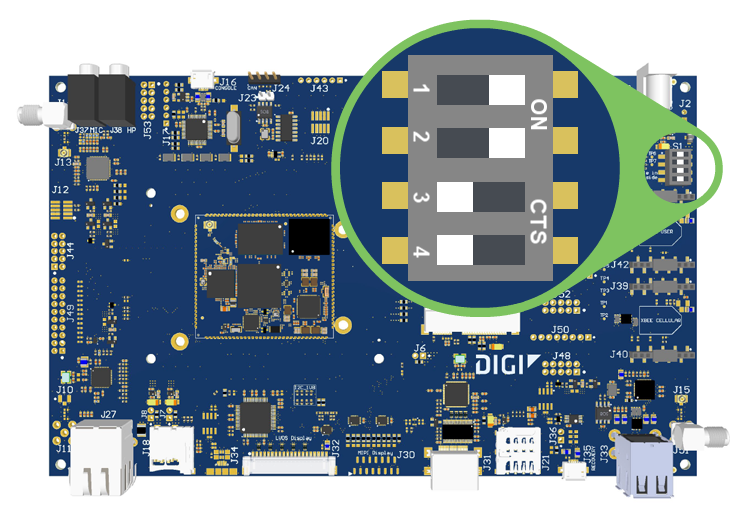
Change the boot mode configuration to boot from USB. To do so, set the boot mode micro-switches as follows:
-
S1.1: ON
-
S1.2: ON
-
S1.3: N/A
-
S1:4: N/A
-
-
Reset the device by pressing the Reset button on the board. No output is displayed in the console.
-
-
Set up the development PC:
-
Download the latest Universal Update Utility (UUU), a software tool from NXP.
UUU version should be 1.5.11 or higher. -
Place the
uuuexecutable in a directory in your PATH, such as/usr/bin. -
Install
udevrules to allow any user to runuuuto access the USB port:$ sudo sh -c "uuu -udev >> /etc/udev/rules.d/70-uuu.rules" $ sudo udevadm control --reload
-
-
Install the firmware:
-
On your development PC, change to the directory where you extracted the ZIP file:
$ cd <zip-folder> -
Run the
install_android_fw_uuu.shscript to program the downloaded image files:$ ./install_android_fw_uuu.sh first-deploy -u u-boot-ccimx8mmdvk.imx
-
-
Boot from the internal eMMC.
-
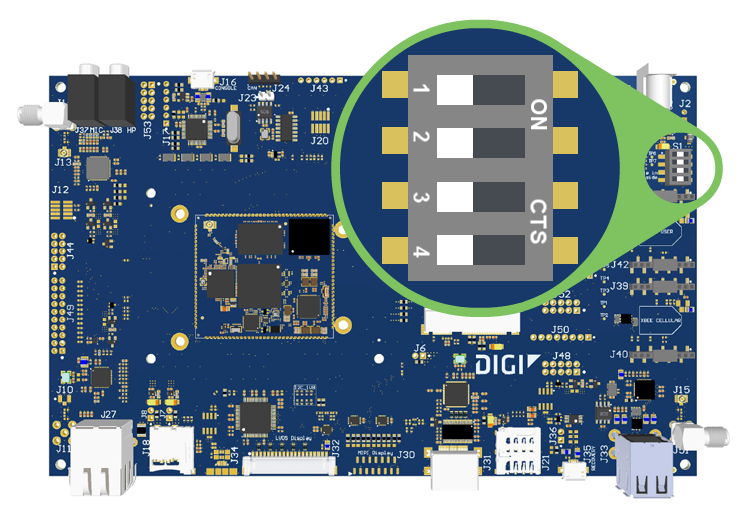
Change the boot mode configuration to boot from the internal eMMC. To do so, set the boot mode micro-switches as follows:
-
S1.1: OFF
-
S1.2: OFF
-
S1.3: OFF
-
S1:4: OFF
-
-
Reset the device by pressing the Reset button on the board.
-
Program the firmware using uSD card
-
Place the decompressed files in the root of a FAT formatted microSD card and insert it in the microSD socket of your device.
-
Connect a microAB USB cable (not included) to the USB CONSOLE connector on the board and to your host computer. See Step 2 - Set up the hardware for instructions.
-
Open a serial connection with the device. You can use any serial terminal program such as Tera Term, Minicom, CoolTerm, or HyperTerminal.
PuTTY terminal program is not recommended due to an incompatibility with the USB/serial driver. Open a serial connection with the following settings:
Parameter Value Port
Serial port where the device is connected
Baud rate
115200
Data bits
8
Parity
None
Stop bits
1
Flow control
None
-
Reset the device by pressing the Reset button on the board, and immediately press any key in the serial terminal to stop the auto-boot process. The U-Boot bootloader prompt displays:
U-Boot SPL dub-2020.04-r3.1-git-00114-g909871f6fff7-dirty (Feb 11 2021 - 16:54:47 +0100) DDRINFO: start DRAM init DDRINFO: DRAM rate 3000MTS DDRINFO:ddrphy calibration done DDRINFO: ddrmix config done Normal Boot Trying to boot from MMC2 U-Boot dub-2020.04-r3.1-git-00114-g909871f6fff7-dirty (Feb 11 2021 - 16:54:47 +0100) CPU: i.MX8MMQ rev1.0 1600 MHz (running at 1200 MHz) CPU: Industrial temperature grade (-40C to 105C) at 32C Reset cause: POR DRAM: 2 GiB MCA: HW_VER=1 FW_VER=1.00 MMC: FSL_SDHC: 1, FSL_SDHC: 0 In: serial Out: serial Err: serial Model: Digi ConnectCore 8M Mini Development Kit ConnectCore 8M Mini SOM variant 0x03: 2 GiB LPDDR4, Wi-Fi, Bluetooth, MCA, Crypto-auth Board version 3, ID undefined Boot: MMC2 BuildInfo: - ATF a7f57f3 - U-Boot dub-2020.04-r3.1-git-00114-g909871f6fff7-dirty flash target is MMC:0 Net: eth0: ethernet@30be0000 Fastboot: Normal Normal Boot Hit any key to stop autoboot: 0 => -
Install the firmware into the internal eMMC, executing the following commands:
=> run install_android_fw_sdDuring installation, error messages appear when the installation process attempts to override MAC addresses. These messages are expected.
## Resetting to default environment
oldval: 00:40:9D:7D:17:9A  defval: 00:04:f3:ff:ff:fa
## Error: Can't overwrite "ethaddr"
himport_r: can't insert "ethaddr=00:04:f3:ff:ff:fa" into hash table
oldval: 00:40:9D:7D:17:9B  defval: 00:04:f3:ff:ff:fb
## Error: Can't overwrite "eth1addr"
himport_r: can't insert "eth1addr=00:04:f3:ff:ff:fb" into hash table
oldval: 00:40:9D:7D:17:9C  defval: 00:04:f3:ff:ff:fc
## Error: Can't overwrite "wlanaddr"
himport_r: can't insert "wlanaddr=00:04:f3:ff:ff:fc" into hash table
oldval: 00:40:9D:7D:17:9D  defval: 00:04:f3:ff:ff:fd
## Error: Can't overwrite "btaddr"
himport_r: can't insert "btaddr=00:04:f3:ff:ff:fd" into hash table
3. Verify Android has started
Once the firmware is installed, the device boots automatically.
| The first Android boot takes several minutes due to system deployment. |
Work with your device as with any standard Android device. From the home screen, swipe up from the dock to navigate and explore the applications or configure your device in the Settings application.
